Friday, May 3, 2013

Food Choice of the Military

Meals of the Military

Some time ago, a man who my father works with returned from deployment. When he returned, he brought back some of the food packages that soldiers receive while they are on duty. I have often wondered how our soldiers prepare cooked meals and exactly what they eat. I always thought it must be difficult to prepare food for them, considering that it has to withstand different temperatures and has to be non-perishable, yet provide them with the necessary amount of energy and nutrition, and that the food must be pretty gross.

For the most part, the food turned out to be OK, but tasted like chemicals. The lack of variety was also somewhat disappointing. 

These food packages, called Meals Ready to Eat (MRE), typically contained two meals, a condiment like jelly or peanut butter, a large white cracker, some sort of fruit preserves or sauce, fruit flavored carbohydrate powder for a drink, a cookie or small cake of some sort, and cutlery. 
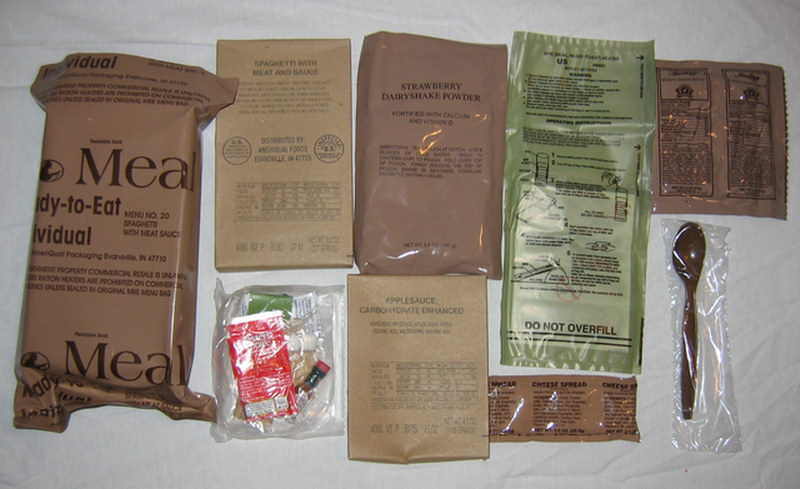
Image from mreinfo.com

This package had a bit more in the package than we had, but the same flat brown cardboard boxes and green and brown bags are the same. 

For the meals, I saw flavors like pork sausage with gravy, pork ribs, and beef stew. I had a bite of the beef stew, and it wasn't as bad as I thought it was going to be. It was definitely stewy, but it didn't taste as chemically as I was anticipating.

If you are interested to see how to actually cook the meals, click here

 I personally liked the white crackers and the cookies and cakes the best. The same large white cracker was the same in every package, accompanied with jelly. The jelly tasted like it was almost certainly purple sugar chemicals, and I doubt they ever saw a grape. The cookies and cakes were actually quite good. I had an M&M cookie and an oatmeal cookie and carrot cake in the rest of them. The cookies looked like and tasted like a regular, yet rather large, off the shelf crumbly cookies. The carrot cake was hard, but it tasted OK. I never actually tried any of the fruit preserves or sauce, but my grandmother liked them well enough. The only things I really couldn't stand were the carbohydrate drinks. The only flavor they had in any of the packages was orange, yet if it hadn't been labeled on the package as so, I wouldn't have been able to tell what the flavor was. It was simply orange chemical water. 

Image from theepicenter.com
The crackers were actually pretty good. They tasted alright on their own or with peanut butter or a better jelly than the one provided.


Here is the jelly packet. I never saw any peanut butter in any of the packages, but I have seen some in pictures online. The crackers actually tasted pretty good with peanut butter as opposed to the jelly.


Here are the different fruit preserves or sauces that were in the package. 

After opening the package of pineapple, there is a thick grey plastic bag that holds the actual fruit.
When I opened the bag and smelled the fruit, it also smelled like chemicals. I never tried any of the fruit, but apparently it isn't that bad.
When I made the orange drink, it basically looked like orange Gatorade. Nothing too fancy. 

Tuesday, March 12, 2013

Banana Bread

 Finished Banana Bread


We have all bought food that we just haven't gotten around to eating. It goes bad, we feel guilty when we throw away the food, and we get frustrated when we waste money. Sometimes we are aware that there is food in our fridge that is going out of date, but it doesn't make for good leftovers. Luckily, bananas are not one of those types of foods. 

Originally found in East Asia, bananas are one of the most popular fruits today. (here). I mean, we all know the Chiquita Banana theme song, right? Even when bananas start to speckle, they are perfectly good to eat. When they start to become severely speckled, they are still capable of being used for baking.

I just so happened to have a few bananas laying around that were in the really speckly stage of life, and I didn't really want to eat them as is, so it was time to make banana bread. The recipe I used was originally for a banana-pecan bread, but I prefer walnuts to pecans.

Original Recipe from The New Good Housekeeping Cookbook 

1-3/4 cups all-purpose flower
2/3 cups sugar
1 teaspoon salt
1/4 teaspoon baking soda
1/2 cup butter/margarine
1 cup mashed banana (about 2 ripe large bananas)
1/2 cup pecans, coarsely chopped
1 teaspoon grated lemon peel
2 eggs, slightly beaten

1. Preheat oven to 350 degrees F. Grease 9" by 5" loaf pan.
2. In large bowl, mix first 5 ingredients. With pastry blender or 2 knives used scissors fashion, cut butter or margarine until mixture resembles coarse crumbs. Stir in bananas, pecans, lemon peel, and eggs just until flavor is moistened. Spoon batter evenly into loaf pan.
3. Bake 55 minutes or until toothpick inserted into center of bread comes out clean. Cool bread in pan on wire rack 10 minutes; remove from pan and finish cooling on wire rack.


First, I used walnuts and craisins instead of pecans.I used 1/2 cup of walnuts and 1/2 cup of craisins. The walnuts were coarsely chopped, though. I used lemon juice because a lemon was not on hand.
 The bananas themselves were not ripe. I find the bread is much sweeter if the bananas are very freckled.


 After mixing the five dry ingredients together, I added the chopped butter, bananas, walnuts, craisins, lemon juice, and eggs. I didn't beat the eggs beforehand.
 When baking anything, its a good idea to get an idea of how easy it will be to get what you are baking out of the pan. It is pretty easy to get the bread out of the pan, but as a precaution I used cooking spray to line the bread pan and sprinkled flour into it.
 After preheating the oven to 350 degrees F, I poured the batter into the pan and stuck it into the oven. The mixture is not going to be watery like a cake batter.


  I really like this kind of bread. It is sweet and I think the walnuts go well with the banana flavor. It is very moist on the inside. I baked this for a total of 55 minutes, and it came out perfectly.
Finished product!

Thursday, January 24, 2013

Coconut Custard Pie

Coconut Custard Pie


While I was walking through the grocery store a few days ago, I noticed that the produce section offered coconuts. For whatever reason, it sort of amazed me that coconuts were kinda small. As a kid, I had always imagined coconuts as bowling ball-sized missiles that could kill you if you walked under a coconut tree. I guess it would still hurt if you got hit by one, but the ones at the grocery store were pretty weeny and unimpressive. 

After mentioning this observation to a relative, they pulled out an old Coconut Custard Pie recipe that they said was a keeper and worked out really well. I really like coconut flavors and foods with coconut in them, but I've never really made anything with coconut. I've never cracked open a coconut, either. One day I will, but for this recipe I just used the pre-shredded stuff.

The original recipe:

5 eggs
1 stick margarine or butter at room temp
3/4 cup buttermilk
2 cups granulated sugar
1 cup coconut (Baker's)
1 teaspoon vanilla flavoring
2 9-inch pie shells

Mix all ingredients together.
Pour into two regular 9-inch shells
Bake at 300 degrees F for 40 minutes or until knife inserted in center comes out clean. 


My relative had made slight alterations to the recipe, so I just went along with what they did. 

Instead of 1 stick of margarine or butter, I used 2/3 stick, and I only used 1.5 cups of granulated sugar.


 To start the mixing process, I creamed the sugar and the butter together. It will still be kind of lumpy, but it makes the rest of the mixing a lot easier.
 To make buttermilk, I put 1 tablespoon of lemon juice into 1 cup of milk and let it sit for 10 minutes to thicken.
 After the buttermilk thickened, I put the eggs and the buttermilk along with the vanilla into the sugar-butter mixture.
 After mixing all of the ingredients together, I put in the coconut shreds. When you mix the ingredients, you will notice that the coconut will rise to the top because the coconut is lighter than the rest of the mixture.
 I wasn't sure if I needed the deeper or the thinner pie shells, so I just played it safe and got the deeper ones. The pies don't rise much at all, so it would be perfectly fine just to use the more shallow pie shells.
 Much to my amazement, the pies actually took around 80 minutes to bake. I have no idea why it took double the time because that never happened when my relative made it. If you check the pies after 40 minutes of baking and it looks like it didn't bake at all, it's fine to let it bake longer. I'm not sure if the oven just never came to temperature, but I was pretty bemused.

After it does bake, it should be golden brown on top. When you cut into it, the custard will be at the bottom and the top will be coconut. Just don't indulge too much. Custard is traditionally very fattening.